HC‑SR04 Ultrasound Distance Measurement with Arduino – Parking Alert (LCD & Buzzer)
Learn HC‑SR04 ultrasound distance measurement with Arduino Uno. Build a parking alert system with 16x2 LCD and buzzer – shows distance and beeps faster as you approach.
Introduction
In this project we are going learn the basic of how a ultrasound sensor works ,How to display the measured value in LCD 16X2 . We also add a buzzer beeping sound when certain distance reached. That is exactly what we will build in this tutorial: a parking alert system using HC‑SR04 ultrasound distance measurement.
Using an Arduino Uno, an HC‑SR04 ultrasonic sensor, a 16x2 I2C LCD, and a buzzer, you will create a system that:
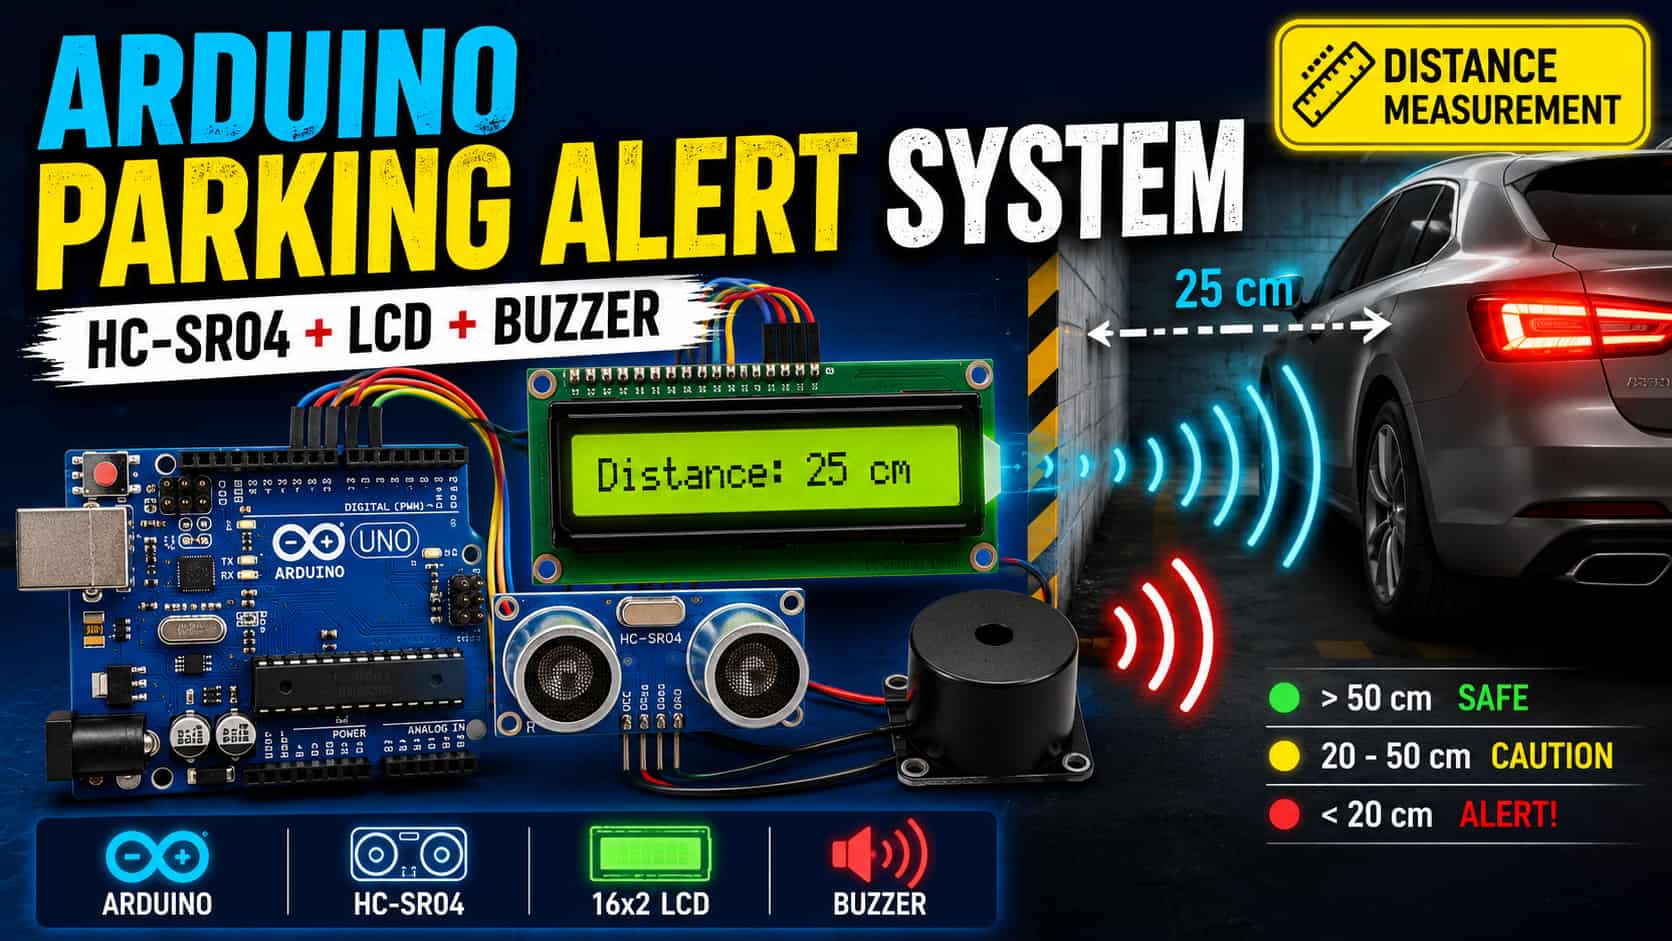
- Measures distance from 2 cm to 400 cm using ultrasound.
- Displays the distance on an LCD screen in real time.
- Beeps faster as objects approach – just like a car’s parking alert.
- Shows a “TOO CLOSE!” warning when an object is within 20 cm.
What you will learn
- How an HC‑SR04 ultrasonic sensor measures distance using sound waves.
- How to connect and read the sensor with
pulseIn(). - How to map a physical value (distance) to a timing interval (buzzer speed).
- How to update the LCD without slowing down the buzzer (non‑blocking timing with
millis()).
After completing this project, we will have a practical parking alert gadget and a solid foundation for obstacle‑avoiding robots, smart dustbins, and distance alarms.
Components
6 itemsHow the HC‑SR04 Ultrasound Distance Measurement Works
The HC‑SR04 works like a tiny bat or sonar. It sends out a short burst of high‑frequency sound (ultrasound) and listens for its echo. The time between sending and receiving tells us how far away an object is.
The four pins
| Pin | Name | Purpose |
|---|---|---|
| VCC | Power | Connect to 5V |
| Trig | Trigger | Send a 10‑microsecond HIGH pulse to start measurement |
| Echo | Echo | Goes HIGH when sound is sent, stays HIGH until echo returns |
| GND | Ground | Connect to GND |
The measurement formula
Sound travels at approximately 0.034 cm per microsecond (µs) through air. The pulseIn() function measures the total round‑trip time in µs.
distance_cm = (duration_µs × 0.034) / 2
We divide by two because the sound travels to the object and back – we only need the one‑way distance.
Why the buzzer beeps faster when you get closer
We map the distance to a delay value. Closer distance → shorter delay between beeps → faster beeping. This gives a natural, intuitive parking alert.
Step‑by‑Step Wiring
We will connect all three components to the Arduino Uno. The LCD and buzzer share power and ground. The I2C LCD uses only two data pins (SDA and SCL), leaving plenty of pins free.
Pin connection table
| Arduino Uno | HC‑SR04 | I2C LCD | Buzzer | Notes |
|---|---|---|---|---|
| 5V | VCC | VCC | VCC (red wire) | Use the breadboard red power rail |
| GND | GND | GND | GND (black wire) | Use the breadboard blue ground rail |
| A4 (SDA) | – | SDA | – | Yellow wire (I2C data) |
| A5 (SCL) | – | SCL | – | Green wire (I2C clock) |
| Pin 9 | Trig | – | – | Blue wire – trigger signal |
| Pin 8 | Echo | – | – | Purple wire – echo signal |
| Pin 11 | – | – | + (long leg) | Signal to turn buzzer on/off |
Buzzer polarity
Most passive buzzers have no polarity (they work either way). If your buzzer has a + sign, connect that side to pin 11 and the other side to GND.
Understanding the Code (Non‑Blocking Design)
The code does four things repeatedly, without ever using delay() (except for the short 50 ms beep itself). This ensures the LCD updates smoothly and the buzzer timing stays accurate.
- Measure distance – trigger the sensor, read the echo pulse, calculate centimeters.
- Map distance to beep delay – closer object → smaller delay → faster beeps.
- Update LCD every 200 ms, show distance and warning message.
- Control buzzer using
millis()– beep at the calculated interval without blocking other tasks.
This non‑blocking approach is essential for any project that must handle multiple tasks simultaneously.
Arduino Code
Copy and paste the code below into your Arduino IDE. Then select Arduino Uno and the correct Port, and click Upload.
Key parts of the code explained
| Section | Purpose |
|---|---|
#include <LiquidCrystal_I2C.h> | Allows easy control of the I2C LCD. |
map(distanceCm, 0, 400, 50, 1000) | Converts a distance (0–400 cm) into a beep delay (50–1000 ms). |
millis() - lastBeepTime >= beepDelayMs | Non‑blocking timer – triggers a beep only when the time interval has passed. |
displayInterval = 200 | LCD refreshes every 200 ms – fast enough for smooth updates, slow enough to avoid flicker. |
Upload and Test
- Connect your Arduino Uno to your computer via USB.
- Select the correct board and port in the Arduino IDE.
- Click Upload.
- Open the Serial Monitor (optional) – set baud rate to 9600 to see debug messages.
What you should observe
| Object distance | LCD first line | LCD second line | Buzzer behavior |
|---|---|---|---|
| No object (out of range) | Distance: 400.0 cm | Safe distance | Silent |
| > 100 cm | Distance: 120.0 cm | Safe distance | Slow, regular beeps (≈1 per second) |
| 20–100 cm | Distance: 45.0 cm | Safe distance | Beeps get faster as you move closer |
| < 20 cm | Distance: 12.0 cm | >> TOO CLOSE! << | Very fast beeps (≈20 per second) |
Move your hand or a book in front of the sensor and watch the LCD change and the buzzer speed increase. This is exactly how a real parking alert system behaves.
Troubleshooting
| Problem | Most Likely Cause | How to Fix |
|---|---|---|
| LCD backlight is on but no text | Wrong I2C address | Change 0x27 to 0x3F in the code, or run an I2C scanner sketch. |
| LCD shows solid white blocks | Contrast potentiometer | Turn the small blue screw on the back of the LCD with a screwdriver. |
| Distance always shows 0 cm or 400 cm | Sensor not triggered correctly | Check wiring: Trig → pin 9, Echo → pin 8, VCC → 5V, GND → GND. |
| Buzzer stays silent | Wrong pin or no power | Ensure buzzer is connected to pin 11 and GND. Try flipping the buzzer wires (no polarity). |
| Buzzer beeps only once then stops | Code has a blocking delay() that stops everything | Our code uses a short delay(50) only inside the beep – that is fine. If you modified the code, remove long delays. |
| Distance readings jump around (jitter) | Sensor placed on unstable surface or near reflective objects | Add a small delay between readings, or take an average of 3–5 readings. |
Extensions – Make It Your Own
Once your parking alert system works, try these upgrades to learn even more:
- Add an LED bar graph – Connect 3–5 LEDs to digital pins. Light up more LEDs as the object gets closer (e.g., 1 LED at 100 cm, 5 LEDs at 10 cm).
- Add a push button – Let the user toggle between centimeters and inches, or mute the buzzer.
- Change the beep frequency – Instead of just beeping faster, use
tone()to make the pitch higher as you get closer. - Mount the sensor on a servo – Sweep the sensor left and right to detect objects in a wider area (radar style).
- Log data – Connect an SD card module to record distances over time (see our SD Card Data Logger tutorial).
Conclusion
Congratulations – you have just built a fully functional parking alert system using HC‑SR04 ultrasound distance measurement with Arduino! You learned:
- How to measure distance with an HC‑SR04 sensor using
pulseIn(). - How to map a physical value to a timing interval (distance → beep delay).
- How to display information on an I2C LCD.
- How to control a buzzer without blocking the rest of your code (non‑blocking design with
millis()).
This project is the foundation for many others: obstacle‑avoiding robots, smart dustbins, liquid level monitors, and more. Keep experimenting, and don’t hesitate to share your build with the SolderHub community.
Related tutorials:
- SD Card Data Logger for Ultrasonic Sensor (Arduino Uno) – coming soon
- ESP32 Ultrasonic Distance Monitor & Web Server – coming soon
Happy making!


